FreeBSD (1)
CPU boost (single core bis 1.4GHz)
Setzt BIOS version > v4.9.0.2 voraus System: Settings: Tunableshint.p4tcc.0.disabled="1" hint.acpi_throttle.0.disabled="1" hint.acpi_perf.0.disabled="1"
multi queue processing
System: Settings: Tunableslegal.intel_igb.license_ack="1" hw.igb.rx_process_limit="-1" hw.igb.tx_process_limit="-1"
Hardware (9)
List Pool
zpool listShow detailed health status
zpool status rpoolShow all properties for the pool
zpool get all rpoolShow I/O Stats
zpool iostat -v rpoolList datasets
root@pve:~# zfs list
NAME USED AVAIL REFER MOUNTPOINT
rpool 20.7G 1.73T 139K /rpool
rpool/ROOT 6.12G 1.73T 128K /rpool/ROOT
rpool/ROOT/pve-1 6.12G 1.73T 6.12G /
rpool/data 14.6G 1.73T 128K /rpool/data
rpool/data/vm-100-disk-0 10.7G 1.73T 10.7G -
rpool/data/vm-101-disk-0 3.85G 1.73T 3.85G -Replacing a failed disk
root@pve:~# zpool status -v
pool: rpool
state: ONLINE
scan: resilvered 143G in 15h22m with 0 errors on Fri Oct 14 10:59:46 2016
config:
NAME STATE READ WRITE CKSUM
rpool ONLINE 0 0 0
raidz1-0 ONLINE 0 0 0
sda2 ONLINE 0 0 0
sdb2 ONLINE 0 0 0
sdc2 ONLINE 0 0 0
errors: No known data errorsAssuming the failing disk is /dev/sdb2, first take the disk offline:
root@pve:~# zpool offline rpool /dev/sdb2
root@pve:~# zpool status -v
pool: rpool
state: DEGRADED
status: One or more devices has been taken offline by the administrator.
Sufficient replicas exist for the pool to continue functioning in a
degraded state.
action: Online the device using 'zpool online' or replace the device with
'zpool replace'.
scan: resilvered 143G in 15h22m with 0 errors on Fri Oct 14 10:59:46 2016
config:
NAME STATE READ WRITE CKSUM
rpool DEGRADED 0 0 0
raidz1-0 DEGRADED 0 0 0
sda2 ONLINE 0 0 0
sdb2 OFFLINE 0 0 0
sdc2 ONLINE 0 0 0
errors: No known data errors
replace the physical disk & clone a working disk’s partition tables, copy the GRUB boot partition, copy the MBR, and rerandomize the GUIDs before letting ZFS at the disk again.
root@pve:~# sgdisk --replicate=/dev/sdb /dev/sda
root@pve:~# sgdisk --randomize-guids /dev/sdb
root@pve:~# grub-install /dev/sdb Replace the disk in the ZFS pool
root@pve:~# zpool replace rpool /dev/sdb2
Check Status:
root@pve:~# zpool status -v
pool: rpool
state: DEGRADED
status: One or more devices is currently being resilvered. The pool will
continue to function, possibly in a degraded state.
action: Wait for the resilver to complete.
scan: resilver in progress since Mon Oct 17 13:02:00 2016
147M scanned out of 298G at 4.46M/s, 19h1m to go
47.3M resilvered, 0.05% done
config:
NAME STATE READ WRITE CKSUM
rpool DEGRADED 0 0 0
raidz1-0 DEGRADED 0 0 0
sda2 ONLINE 0 0 0
replacing-1 OFFLINE 0 0 0
old OFFLINE 0 0 0
sdb2 ONLINE 0 0 0 (resilvering)
sdc2 ONLINE 0 0 0
errors: No known data errors
Add Cache to existing pool
zpool add -f rpool cache sdcProblem
Windows 10 uEFI based systems get error 0xc000000e on boot after cloning.
Error Message
Your PC/Device needs to be repaired
A required device isn’t connected or can’t be accessed
Error code: 0xc000000e
You’ll need to use recovery tools. If you don’t have any installation media (like a disc or USB device), contract your PC administrator or PC/Device manufacturer.
- Run:
DISKPART - Run following commands from the DISKPART prompt to assign drive letters to the EFI System Partition and the partition containing the restored Windows operating system volume:
LIST DISK
SEL DISK 0(this is an example. Replace 0 with disk number for the drive containing OS as found in the LIST DISK output)
LIST VOL
SEL VOL 3(this is an example. Replace 3 with the volume number in the list corresponding with EFI System Partition. On a default install of Windows 10 this will be listed as the 99 MB FAT32 Hidden partition, but size may vary)
ASSIGN LETTER=E:(this is an example. Any available drive letter may be used in place of e:. If the EFI System Partition already shows a drive letter, note the letter shown and skip this step)
SEL VOL 1(this is an example. Replace 1 with the volume number corresponding with the restored C: drive. Look at size of listed volumes to determine which is the restored C:)
ASSIGN LETTER=F:(this is an example. Any available drive letter may be used in place of f:. If the Windows OS partititon already shows a drive letter, note the letter shown and skip this step)
EXIT - Run the following commands from the command prompt:
BCDEDITNote the „identifier“ listed for Windows Boot Manager and Windows Boot loader after running the above command. The following examples use {bootmgr} and {default} as the identifiers, respectively. Examples below also use e: and f: as the drive letters as set in diskpart above. Replace these in the commands with the drive letters assigned in diskpart if differentBCDEDIT /SET {bootmgr} device partition=e:
BCDEDIT /SET {default} device partition=f:
BCDEDIT /SET {default} osdevice partition=f: - Remove the SRD disk and reboot the computer.
Günstiges Glaszeug: https://www.fs.com/de/
SFP / SFP+ / DAC
SFP(+) bietet in der Praxis KEINEN Geschwindigkeitsvorteil wenn es darum geht Switches miteinander zu verbinden. Es kann Sinn machen wenn Switches über Distanzen grösser 100m miteinander verbunden werden müssen. Bei 1 GBit Switches welche zusätzlich SFP+ Ports haben sind diese Ports natürlich in der Lage bis zu 10 GBit/s zu übertragen, was dann schneller ist.
Grosse Hersteller wie HPE/Aruba, Cisco etc. blockieren „fremde“ Module oft.
Technisch gibt es keinen Grund warum sie nicht funktionieren und weder Modul noch Switch nehmen Schaden.
SFP
- Anschluss für div. Module bis 1 GBit/s (in Spezialfällen auch 1.25 GBit/s)
- Manche Hersteller nannten es eine Weile auch Mini-GBIC
- Keine DAC (Direct Attach Cable) spezifiziert
SFP+
- Anschluss für div. Module bis 10 GBit/s (10 GBit Ethernet, aber auch 16 GBit/s FC Fibrechannel)
- Weiterentwicklung von SFP
- Mechanisch kompatibel zu SFP
- SFP Module (1 GBit/s) funktionieren in SFP+
DAC
- DAC = Direct Attach Cable
- Kabel um Switches mit SFP+ Steckplätzen direkt zu verbinden, ohne SFP+ Module zu verwenden
- Praxis: Nur verwenden wenn die Switches und das DAC vom selben Hersteller sind
- Passive DAC 1m bis 7m, aktive DAC bis 15m
- AOC: Das „Kabel“ ist eigentlich eine Glasfaser mit den entsprechenden Optiken direkt im Adapter
- Theoretisch besteht auch die Möglichkeit Server mit SFP+ Ports per DAC an Switches mit SFP+ Ports zu hängen. Da hier aber bis zu 3 Hersteller involviert sind (Hersteller der Netzwerkkarte im Server, Hersteller des Kabels, Hersteller des Switches) kann es zu Inkompatibilitäten kommen. Ich rate aus Erfahrung dringend davon ab.
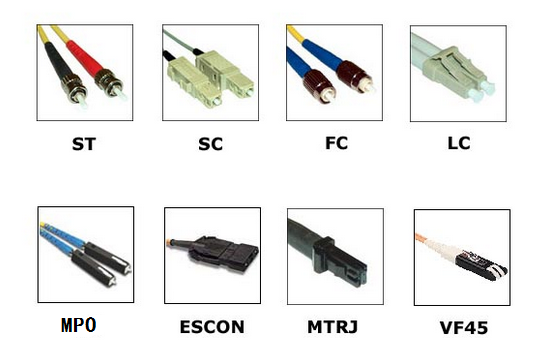
Steckertypen
In der Praxis relevant sind in unserer Umgebung meist LC.
Multimode & Singlemode
Aufbau der Glasfaser. Die 2 Modes sind NICHT kompatibel. Im Normalfall entscheidet man sich für einen der beiden Standards.
Multimode
- Bis 550m
- Günstiger als Singlemode
- 62.5 µm oder 50 µm Kerndurchmesser
Singlemode
- Für Distanzen über 550m
- 9 µm Kerndurchmesser
Simplex / Duplex
Simplex
1 Glasfaser, in unserer Umgebung z.B. an den FTTH Anschlüssen von Swisscom / Init7 / SAK
Duplex
2 parallele Glasfaern, das „Normale“ bei Servern / Switches
FTTH
In der Schweiz wird der LC Stecker verwendet. Beim Kabel handelt es sich um simplex (1 Faser), mit speziellem APC Schliff auf der Seite OTO (Dose an der Wand).
Das SFP Modul muss folgende Spezifikation erfüllen:
- 1 Gbit/s simplex SFP (10 km, TX 1310nm / RX 1490–1550nm)
Das Anschlusskabel:
- Seite OTO (Dose an der Wand): LC / APC
- Seite SFP: Je nach verwendetem Modul, meist LC / PC
- Beispiel Adapter tp-link
- TP-Link SFP Modul TL-SM321B (Alltron Artikel-Nr.: 203847)
- Kabel siehe Zubehör vom Modul z.B. https://alltron.ch/de/product/324448
- TP-Link Medienkonverter MC220L V4 (Alltron Artikel-Nr.: 110616)
- TP-Link SFP Modul TL-SM321B (Alltron Artikel-Nr.: 203847)
LX / BX / ZX etc
Beschreibt bei SFP die Wellenlänge und erreichbare Reichweite. Existiert auch bei SFP+ für 10 GBit/s, hier der Einfachheit nicht aufgeführt.
SX
1 Gbit/s, Multimode, LC Stecker, bis 550m -> Für normale Anwendungen kostengünstigste Variante für Glasfaserverbindung
LX
1 – 2.5 GBit/s, Singlemode, LC Stecker, bis 10km
EX / ZX / BX
1 – 2.5 GBit/s, Singlemode, LC Stecker, je nach Standard 40-160km
Anzeigen aller Drives:
./storcli64 /c0 show
Output (als Beispiel):
——————————————————————————
EID:Slt DID State DG Size Intf Med SED PI SeSz Model Sp
——————————————————————————
252:0 8 Onln 0 931.0 GB SATA SSD N N 512B Samsung SSD 850 EVO 1TB U
252:1 9 Onln 0 931.0 GB SATA SSD N N 512B Samsung SSD 850 EVO 1TB U
Drive “offline” setzen:
./storcli64 /c0 /e252 /s1 set offline
Drive als “missing” setzen:
./storcli64 /c0 /e252 /s1 set missing
Drive spindown zum entfernen:
./storcli64 /c0 /e252 /s1 spindown
Danach Disk/SSD ersetzen. Der Rebuidl startet automatisch. Den Status kann man mittels folgendem Befehl kontrollieren:
./storcli64 /c0 /eall /sall show rebuild
Beispiel output:
———————————————————-
Drive-ID Progress% Status Estimated Time Left
———————————————————-
/c0/e252/s0 – Not in progress –
/c0/e252/s1 46 In progress –
- iLO: Power & Thermal -> Power Settings -> Power Regulator Settings -> Static High Performance Mode Einstellung
- iLO Gen10 zusätzlich -> Intelligent System Tuning -> Settings -> Configure with Always On -> Perform Maintenance -> BIOS/Platform Configuration -> Dann auf der ersten Seite mit der ROM Übersicht ganz unten: Workload Profile auf „Virtualization – Max Performance“ einstellen -> Update klicken (URL https://[iLO IP]/provision/). Braucht einen Server Reset.
- Fritzbox aus- und wieder einstecken
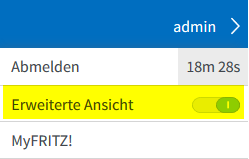
- Auf http://fritz.box (http://192.168.178.1) zugreifen
- Auf „Passwort vergessen“ link klicken und Fritzbox zurücksetzen
- Sprache wählen, Land wählen, Annex A (für IP only und analog) wählen (Fritzbox rebootet)
- Wieder anmelden an Fritzbox

- Internet -> Zugangsdaten -> Internetzugang
- Internetanbieter: anderer Internetanbieter
- Zugangsdaten: Werden Zugangsdaten benötigt? [X] Nein
- Verbindungseinstellungen ändern -> [X] Angeschlossene Netzwerkgeräte dürfen zusätzlich ihre eigene Internetverbindung aufbauen (nicht empfohlen)
- [ ] Internetzugang nach dem „Übernehmen“ prüfen
- Übernehmen
CPU boost (single core bis 1.4GHz)
Setzt BIOS version > v4.9.0.2 voraus
System: Settings: Tunables
hint.p4tcc.0.disabled="1"
hint.acpi_throttle.0.disabled="1"
hint.acpi_perf.0.disabled="1"
multi queue processing
System: Settings: Tunables
legal.intel_igb.license_ack="1"
hw.igb.rx_process_limit="-1"
hw.igb.tx_process_limit="-1"
- TinyCore USB installer v1.8 download http://pcengines.ch/file/apu-bootable-usb-installer_v1.8.exe (erstellt bootbaren USB Stick)
- BIOS von https://pcengines.github.io/#mr-21 downloaden (wir haben apu2 v4.9.0.4 oder neuer)
- BIOS file (apu2_v4.9.0.4.rom) auf den USB Stick kopieren
- Serial Kabel an APU anhängen, 115200 8N1 (Nullmodem, ausgekreuzt)
- APU mit eingestecktem USB Stick booten (default starten die APUs ab USB Stick wenn vorhanden)
- BIOS flashen:
flashrom -w apu2_v4.9.0.4.rom
Linux (2)
List Pool
zpool listShow detailed health status
zpool status rpoolShow all properties for the pool
zpool get all rpoolShow I/O Stats
zpool iostat -v rpoolList datasets
root@pve:~# zfs list
NAME USED AVAIL REFER MOUNTPOINT
rpool 20.7G 1.73T 139K /rpool
rpool/ROOT 6.12G 1.73T 128K /rpool/ROOT
rpool/ROOT/pve-1 6.12G 1.73T 6.12G /
rpool/data 14.6G 1.73T 128K /rpool/data
rpool/data/vm-100-disk-0 10.7G 1.73T 10.7G -
rpool/data/vm-101-disk-0 3.85G 1.73T 3.85G -
Replacing a failed disk
root@pve:~# zpool status -v
  pool: rpool
 state: ONLINE
  scan: resilvered 143G in 15h22m with 0 errors on Fri Oct 14 10:59:46 2016
config:

        NAME        STATE     READ WRITE CKSUM
        rpool       ONLINE       0     0     0
          raidz1-0  ONLINE       0     0     0
            sda2    ONLINE       0     0     0
            sdb2    ONLINE       0     0     0
            sdc2    ONLINE       0     0     0

errors: No known data errors
Assuming the failing disk is /dev/sdb2, first take the disk offline:
root@pve:~# zpool offline rpool /dev/sdb2
root@pve:~# zpool status -v
  pool: rpool
 state: DEGRADED
status: One or more devices has been taken offline by the administrator.
        Sufficient replicas exist for the pool to continue functioning in a
        degraded state.
action: Online the device using 'zpool online' or replace the device with
        'zpool replace'.
  scan: resilvered 143G in 15h22m with 0 errors on Fri Oct 14 10:59:46 2016
config:

        NAME        STATE     READ WRITE CKSUM
        rpool       DEGRADED     0     0     0
          raidz1-0  DEGRADED     0     0     0
            sda2    ONLINE       0     0     0
            sdb2    OFFLINE      0     0     0
            sdc2    ONLINE       0     0     0

errors: No known data errors
replace the physical disk & clone a working disk’s partition tables, copy the GRUB boot partition, copy the MBR, and rerandomize the GUIDs before letting ZFS at the disk again.
root@pve:~# sgdisk --replicate=/dev/sdb /dev/sda
root@pve:~# sgdisk --randomize-guids /dev/sdb
root@pve:~# grub-install /dev/sdb
Replace the disk in the ZFS pool
root@pve:~# zpool replace rpool /dev/sdb2
Check Status:
root@pve:~# zpool status -v
  pool: rpool
 state: DEGRADED
status: One or more devices is currently being resilvered.  The pool will
	continue to function, possibly in a degraded state.
action: Wait for the resilver to complete.
  scan: resilver in progress since Mon Oct 17 13:02:00 2016
    147M scanned out of 298G at 4.46M/s, 19h1m to go
    47.3M resilvered, 0.05% done
config:

	NAME             STATE     READ WRITE CKSUM
	rpool            DEGRADED     0     0     0
	  raidz1-0       DEGRADED     0     0     0
	    sda2         ONLINE       0     0     0
	    replacing-1  OFFLINE      0     0     0
	      old        OFFLINE      0     0     0
	      sdb2       ONLINE       0     0     0  (resilvering)
	    sdc2         ONLINE       0     0     0

errors: No known data errors
Add Cache to existing pool
zpool add -f rpool cache sdcAnzeigen aller Drives:
./storcli64 /c0 show
Output (als Beispiel):
——————————————————————————
EID:Slt DID State DG Size Intf Med SED PI SeSz Model Sp
——————————————————————————
252:0 8 Onln 0 931.0 GB SATA SSD N N 512B Samsung SSD 850 EVO 1TB U
252:1 9 Onln 0 931.0 GB SATA SSD N N 512B Samsung SSD 850 EVO 1TB U
Drive “offline” setzen:
./storcli64 /c0 /e252 /s1 set offline
Drive als “missing” setzen:
./storcli64 /c0 /e252 /s1 set missing
Drive spindown zum entfernen:
./storcli64 /c0 /e252 /s1 spindown
Danach Disk/SSD ersetzen. Der Rebuidl startet automatisch. Den Status kann man mittels folgendem Befehl kontrollieren:
./storcli64 /c0 /eall /sall show rebuild
Beispiel output:
———————————————————-
Drive-ID Progress% Status Estimated Time Left
———————————————————-
/c0/e252/s0 – Not in progress –
/c0/e252/s1 46 In progress –
Windows (1)
Problem
Windows 10 uEFI based systems get error 0xc000000e on boot after cloning.
Error Message
Your PC/Device needs to be repaired
A required device isn’t connected or can’t be accessed
Error code: 0xc000000e
You’ll need to use recovery tools. If you don’t have any installation media (like a disc or USB device), contract your PC administrator or PC/Device manufacturer.
- Run:
DISKPART - Run following commands from the DISKPART prompt to assign drive letters to the EFI System Partition and the partition containing the restored Windows operating system volume:
LIST DISK
SEL DISK 0(this is an example. Replace 0 with disk number for the drive containing OS as found in the LIST DISK output)
LIST VOL
SEL VOL 3(this is an example. Replace 3 with the volume number in the list corresponding with EFI System Partition. On a default install of Windows 10 this will be listed as the 99 MB FAT32 Hidden partition, but size may vary)
ASSIGN LETTER=E:(this is an example. Any available drive letter may be used in place of e:. If the EFI System Partition already shows a drive letter, note the letter shown and skip this step)
SEL VOL 1(this is an example. Replace 1 with the volume number corresponding with the restored C: drive. Look at size of listed volumes to determine which is the restored C:)
ASSIGN LETTER=F:(this is an example. Any available drive letter may be used in place of f:. If the Windows OS partititon already shows a drive letter, note the letter shown and skip this step)
EXIT - Run the following commands from the command prompt:
BCDEDITNote the „identifier“ listed for Windows Boot Manager and Windows Boot loader after running the above command. The following examples use {bootmgr} and {default} as the identifiers, respectively. Examples below also use e: and f: as the drive letters as set in diskpart above. Replace these in the commands with the drive letters assigned in diskpart if differentBCDEDIT /SET {bootmgr} device partition=e:
BCDEDIT /SET {default} device partition=f:
BCDEDIT /SET {default} osdevice partition=f: - Remove the SRD disk and reboot the computer.