365 (3)
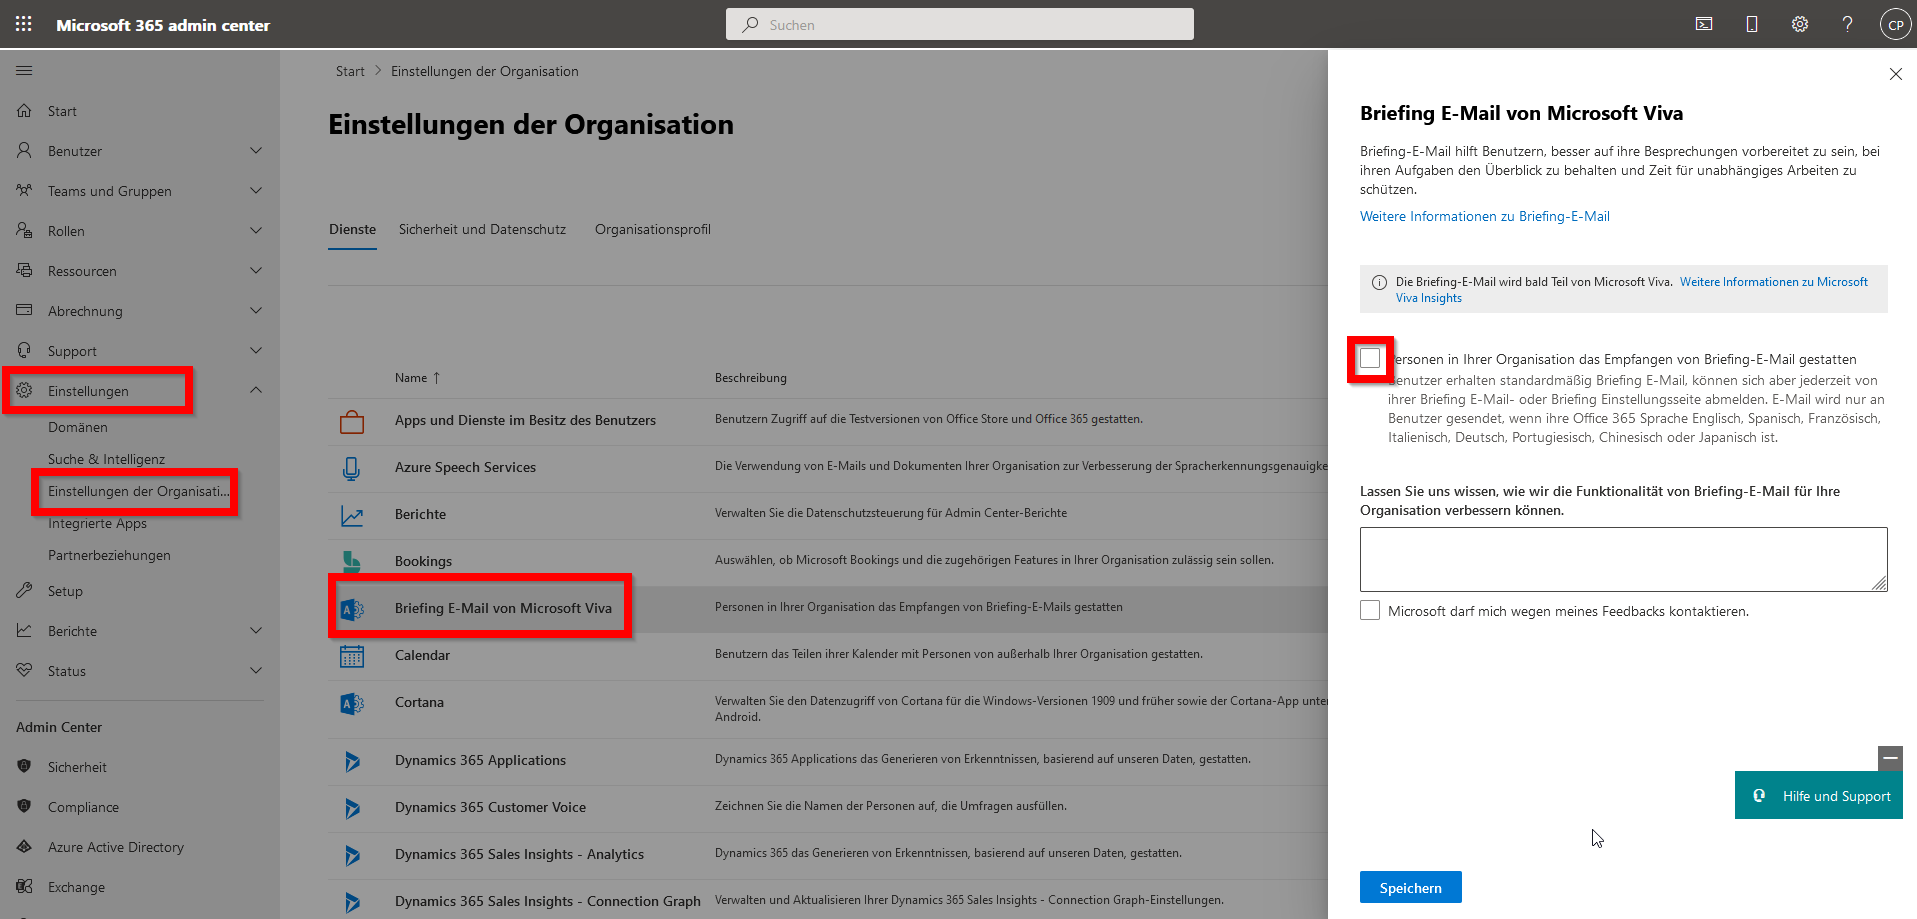
Exchange (5)
Einstellungen für die Domain im DNS
_autodiscover._tcp.<kundendomain>.ch. IN SRV 0 0 443 autodiscover.intern.legatech.net.
oder
_autodiscover._tcp.<kundendomain>.ch. IN SRV 0 0 443 autodiscover.aufmail.ch.
Einstellungen auf dem Client
Registry
HKEY_CURRENT_USER\Software\Microsoft\Office\16.0\Outlook\AutoDiscover (Autodiscover Schlüssel ev. erstellen)
-> Neu: DWORD ExcludeExplicitO365Endpoint, Wert: 1
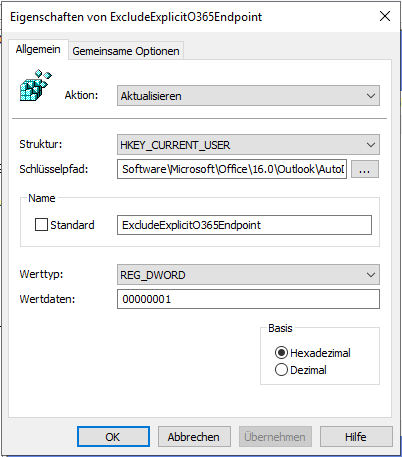
Oder als GPO
Benutzerkonfiguration -> Einstellungen -> Windows-Einstellungen -> Registrierung -> Neu -> Registrierungselement:
In der Exchange Management Shell:
Add-PSSnapin Microsoft.Exchange.Management.PowerShell.E2010
Get-MailboxExportRequest -Status Completed | Remove-MailboxExportRequest -Confirm:$false
foreach ($AllMailboxes in (Get-Mailbox)) { New-MailboxExportRequest -Mailbox $AllMailboxes -FilePath "\\server\freigabe\$($AllMailboxes.Alias).pst" }
- Anzeigen aller geblockten Adressen eines Users:
(Get-MailboxJunkEmailConfiguration [username]).TrustedSendersAndDomains
- Suchen in der Liste:
 (Get-MailboxJunkEmailConfiguration
[username]).TrustedSendersAndDomains |findstr "domain.ch"
- Absender aus der Liste entfernen:
 Set-MailboxJunkEmailConfiguration -id
[username]  -BlockedSendersAndDomains @{Remove="user@domain.ch"}
FreeBSD (2)
named.conf
options {
  .....
  dnssec-validation auto;
  dnssec-enable yes;
  key-directory "/usr/local/etc/namedb/key";
};
Zonendefinition anpassen:
zone "example.ch" {
  type master;
  file "/usr/local/etc/namedb/master/example.ch";
  allow-query { any; };
  allow-transfer { slaves; };
  notify yes;
  update-policy local; auto-dnssec maintain; dnssec-secure-to-insecure yes; inline-signing yes;
};
Keys erstellen
mkdir /usr/local/etc/namedb/key
cd /usr/local/etc/namedb/key
dnssec-keygen -a RSASHA256 -b 2048 -a ECDSAP256SHA256 -3 example.ch
dnssec-keygen -a RSASHA256 -b 2048 -a ECDSAP256SHA256 -3 -fk example.ch
chown -R bind:bind /usr/local/etc/namedb/key
rndc loadkeys example.ch
rndc signing -nsec3param 1 0 10 `od -Anone -tx4 -N4 /dev/urandom` example.ch
Keys anzeigen
rndc signing -list example.ch # Show signing status
Done signing with key 65481/NSEC3RSASHA1
Done signing with key 58725/ECDSAP256SHA256
Zonen ändern
rndc freeze example.ch
edit /usr/local/etc/namedb/master/example.ch
rndc thaw example.ch
CPU boost (single core bis 1.4GHz)
Setzt BIOS version > v4.9.0.2 voraus
System: Settings: Tunables
hint.p4tcc.0.disabled="1"
hint.acpi_throttle.0.disabled="1"
hint.acpi_perf.0.disabled="1"
multi queue processing
System: Settings: Tunables
legal.intel_igb.license_ack="1"
hw.igb.rx_process_limit="-1"
hw.igb.tx_process_limit="-1"
Hardware (9)
List Pool
zpool listShow detailed health status
zpool status rpoolShow all properties for the pool
zpool get all rpoolShow I/O Stats
zpool iostat -v rpoolList datasets
root@pve:~# zfs list
NAME USED AVAIL REFER MOUNTPOINT
rpool 20.7G 1.73T 139K /rpool
rpool/ROOT 6.12G 1.73T 128K /rpool/ROOT
rpool/ROOT/pve-1 6.12G 1.73T 6.12G /
rpool/data 14.6G 1.73T 128K /rpool/data
rpool/data/vm-100-disk-0 10.7G 1.73T 10.7G -
rpool/data/vm-101-disk-0 3.85G 1.73T 3.85G -
Replacing a failed disk
root@pve:~# zpool status -v
  pool: rpool
 state: ONLINE
  scan: resilvered 143G in 15h22m with 0 errors on Fri Oct 14 10:59:46 2016
config:

        NAME        STATE     READ WRITE CKSUM
        rpool       ONLINE       0     0     0
          raidz1-0  ONLINE       0     0     0
            sda2    ONLINE       0     0     0
            sdb2    ONLINE       0     0     0
            sdc2    ONLINE       0     0     0

errors: No known data errors
Assuming the failing disk is /dev/sdb2, first take the disk offline:
root@pve:~# zpool offline rpool /dev/sdb2
root@pve:~# zpool status -v
  pool: rpool
 state: DEGRADED
status: One or more devices has been taken offline by the administrator.
        Sufficient replicas exist for the pool to continue functioning in a
        degraded state.
action: Online the device using 'zpool online' or replace the device with
        'zpool replace'.
  scan: resilvered 143G in 15h22m with 0 errors on Fri Oct 14 10:59:46 2016
config:

        NAME        STATE     READ WRITE CKSUM
        rpool       DEGRADED     0     0     0
          raidz1-0  DEGRADED     0     0     0
            sda2    ONLINE       0     0     0
            sdb2    OFFLINE      0     0     0
            sdc2    ONLINE       0     0     0

errors: No known data errors
replace the physical disk & clone a working disk’s partition tables, copy the GRUB boot partition, copy the MBR, and rerandomize the GUIDs before letting ZFS at the disk again.
root@pve:~# sgdisk --replicate=/dev/sdb /dev/sda
root@pve:~# sgdisk --randomize-guids /dev/sdb
root@pve:~# grub-install /dev/sdb
Replace the disk in the ZFS pool
root@pve:~# zpool replace rpool /dev/sdb2
Check Status:
root@pve:~# zpool status -v
  pool: rpool
 state: DEGRADED
status: One or more devices is currently being resilvered.  The pool will
	continue to function, possibly in a degraded state.
action: Wait for the resilver to complete.
  scan: resilver in progress since Mon Oct 17 13:02:00 2016
    147M scanned out of 298G at 4.46M/s, 19h1m to go
    47.3M resilvered, 0.05% done
config:

	NAME             STATE     READ WRITE CKSUM
	rpool            DEGRADED     0     0     0
	  raidz1-0       DEGRADED     0     0     0
	    sda2         ONLINE       0     0     0
	    replacing-1  OFFLINE      0     0     0
	      old        OFFLINE      0     0     0
	      sdb2       ONLINE       0     0     0  (resilvering)
	    sdc2         ONLINE       0     0     0

errors: No known data errors
Add Cache to existing pool
zpool add -f rpool cache sdcProblem
Windows 10 uEFI based systems get error 0xc000000e on boot after cloning.
Error Message
Your PC/Device needs to be repaired
A required device isn’t connected or can’t be accessed
Error code: 0xc000000e
You’ll need to use recovery tools. If you don’t have any installation media (like a disc or USB device), contract your PC administrator or PC/Device manufacturer.
- Run:
DISKPART - Run following commands from the DISKPART prompt to assign drive letters to the EFI System Partition and the partition containing the restored Windows operating system volume:
LIST DISK
SEL DISK 0(this is an example. Replace 0 with disk number for the drive containing OS as found in the LIST DISK output)
LIST VOL
SEL VOL 3(this is an example. Replace 3 with the volume number in the list corresponding with EFI System Partition. On a default install of Windows 10 this will be listed as the 99 MB FAT32 Hidden partition, but size may vary)
ASSIGN LETTER=E:(this is an example. Any available drive letter may be used in place of e:. If the EFI System Partition already shows a drive letter, note the letter shown and skip this step)
SEL VOL 1(this is an example. Replace 1 with the volume number corresponding with the restored C: drive. Look at size of listed volumes to determine which is the restored C:)
ASSIGN LETTER=F:(this is an example. Any available drive letter may be used in place of f:. If the Windows OS partititon already shows a drive letter, note the letter shown and skip this step)
EXIT - Run the following commands from the command prompt:
BCDEDITNote the „identifier“ listed for Windows Boot Manager and Windows Boot loader after running the above command. The following examples use {bootmgr} and {default} as the identifiers, respectively. Examples below also use e: and f: as the drive letters as set in diskpart above. Replace these in the commands with the drive letters assigned in diskpart if differentBCDEDIT /SET {bootmgr} device partition=e:
BCDEDIT /SET {default} device partition=f:
BCDEDIT /SET {default} osdevice partition=f: - Remove the SRD disk and reboot the computer.
Günstiges Glaszeug: https://www.fs.com/de/
SFP / SFP+ / DAC
SFP(+) bietet in der Praxis KEINEN Geschwindigkeitsvorteil wenn es darum geht Switches miteinander zu verbinden. Es kann Sinn machen wenn Switches über Distanzen grösser 100m miteinander verbunden werden müssen. Bei 1 GBit Switches welche zusätzlich SFP+ Ports haben sind diese Ports natürlich in der Lage bis zu 10 GBit/s zu übertragen, was dann schneller ist.
Grosse Hersteller wie HPE/Aruba, Cisco etc. blockieren „fremde“ Module oft.
Technisch gibt es keinen Grund warum sie nicht funktionieren und weder Modul noch Switch nehmen Schaden.
SFP
- Anschluss für div. Module bis 1 GBit/s (in Spezialfällen auch 1.25 GBit/s)
- Manche Hersteller nannten es eine Weile auch Mini-GBIC
- Keine DAC (Direct Attach Cable) spezifiziert
SFP+
- Anschluss für div. Module bis 10 GBit/s (10 GBit Ethernet, aber auch 16 GBit/s FC Fibrechannel)
- Weiterentwicklung von SFP
- Mechanisch kompatibel zu SFP
- SFP Module (1 GBit/s) funktionieren in SFP+
DAC
- DAC = Direct Attach Cable
- Kabel um Switches mit SFP+ Steckplätzen direkt zu verbinden, ohne SFP+ Module zu verwenden
- Praxis: Nur verwenden wenn die Switches und das DAC vom selben Hersteller sind
- Passive DAC 1m bis 7m, aktive DAC bis 15m
- AOC: Das „Kabel“ ist eigentlich eine Glasfaser mit den entsprechenden Optiken direkt im Adapter
- Theoretisch besteht auch die Möglichkeit Server mit SFP+ Ports per DAC an Switches mit SFP+ Ports zu hängen. Da hier aber bis zu 3 Hersteller involviert sind (Hersteller der Netzwerkkarte im Server, Hersteller des Kabels, Hersteller des Switches) kann es zu Inkompatibilitäten kommen. Ich rate aus Erfahrung dringend davon ab.
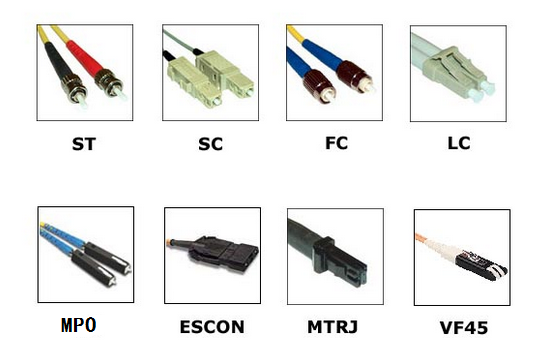
Steckertypen
In der Praxis relevant sind in unserer Umgebung meist LC.
Multimode & Singlemode
Aufbau der Glasfaser. Die 2 Modes sind NICHT kompatibel. Im Normalfall entscheidet man sich für einen der beiden Standards.
Multimode
- Bis 550m
- Günstiger als Singlemode
- 62.5 µm oder 50 µm Kerndurchmesser
Singlemode
- Für Distanzen über 550m
- 9 µm Kerndurchmesser
Simplex / Duplex
Simplex
1 Glasfaser, in unserer Umgebung z.B. an den FTTH Anschlüssen von Swisscom / Init7 / SAK
Duplex
2 parallele Glasfaern, das „Normale“ bei Servern / Switches
FTTH
In der Schweiz wird der LC Stecker verwendet. Beim Kabel handelt es sich um simplex (1 Faser), mit speziellem APC Schliff auf der Seite OTO (Dose an der Wand).
Das SFP Modul muss folgende Spezifikation erfüllen:
- 1 Gbit/s simplex SFP (10 km, TX 1310nm / RX 1490–1550nm)
Das Anschlusskabel:
- Seite OTO (Dose an der Wand): LC / APC
- Seite SFP: Je nach verwendetem Modul, meist LC / PC
- Beispiel Adapter tp-link
- TP-Link SFP Modul TL-SM321B (Alltron Artikel-Nr.: 203847)
- Kabel siehe Zubehör vom Modul z.B. https://alltron.ch/de/product/324448
- TP-Link Medienkonverter MC220L V4 (Alltron Artikel-Nr.: 110616)
- TP-Link SFP Modul TL-SM321B (Alltron Artikel-Nr.: 203847)
LX / BX / ZX etc
Beschreibt bei SFP die Wellenlänge und erreichbare Reichweite. Existiert auch bei SFP+ für 10 GBit/s, hier der Einfachheit nicht aufgeführt.
SX
1 Gbit/s, Multimode, LC Stecker, bis 550m -> Für normale Anwendungen kostengünstigste Variante für Glasfaserverbindung
LX
1 – 2.5 GBit/s, Singlemode, LC Stecker, bis 10km
EX / ZX / BX
1 – 2.5 GBit/s, Singlemode, LC Stecker, je nach Standard 40-160km
Anzeigen aller Drives:
./storcli64 /c0 show
Output (als Beispiel):
——————————————————————————
EID:Slt DID State DG Size Intf Med SED PI SeSz Model Sp
——————————————————————————
252:0 8 Onln 0 931.0 GB SATA SSD N N 512B Samsung SSD 850 EVO 1TB U
252:1 9 Onln 0 931.0 GB SATA SSD N N 512B Samsung SSD 850 EVO 1TB U
Drive “offline” setzen:
./storcli64 /c0 /e252 /s1 set offline
Drive als “missing” setzen:
./storcli64 /c0 /e252 /s1 set missing
Drive spindown zum entfernen:
./storcli64 /c0 /e252 /s1 spindown
Danach Disk/SSD ersetzen. Der Rebuidl startet automatisch. Den Status kann man mittels folgendem Befehl kontrollieren:
./storcli64 /c0 /eall /sall show rebuild
Beispiel output:
———————————————————-
Drive-ID Progress% Status Estimated Time Left
———————————————————-
/c0/e252/s0 – Not in progress –
/c0/e252/s1 46 In progress –
- iLO: Power & Thermal -> Power Settings -> Power Regulator Settings -> Static High Performance Mode Einstellung
- iLO Gen10 zusätzlich -> Intelligent System Tuning -> Settings -> Configure with Always On -> Perform Maintenance -> BIOS/Platform Configuration -> Dann auf der ersten Seite mit der ROM Übersicht ganz unten: Workload Profile auf „Virtualization – Max Performance“ einstellen -> Update klicken (URL https://[iLO IP]/provision/). Braucht einen Server Reset.
- Fritzbox aus- und wieder einstecken
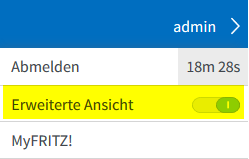
- Auf http://fritz.box (http://192.168.178.1) zugreifen
- Auf „Passwort vergessen“ link klicken und Fritzbox zurücksetzen
- Sprache wählen, Land wählen, Annex A (für IP only und analog) wählen (Fritzbox rebootet)
- Wieder anmelden an Fritzbox

- Internet -> Zugangsdaten -> Internetzugang
- Internetanbieter: anderer Internetanbieter
- Zugangsdaten: Werden Zugangsdaten benötigt? [X] Nein
- Verbindungseinstellungen ändern -> [X] Angeschlossene Netzwerkgeräte dürfen zusätzlich ihre eigene Internetverbindung aufbauen (nicht empfohlen)
- [ ] Internetzugang nach dem „Übernehmen“ prüfen
- Übernehmen
CPU boost (single core bis 1.4GHz)
Setzt BIOS version > v4.9.0.2 voraus
System: Settings: Tunables
hint.p4tcc.0.disabled="1"
hint.acpi_throttle.0.disabled="1"
hint.acpi_perf.0.disabled="1"
multi queue processing
System: Settings: Tunables
legal.intel_igb.license_ack="1"
hw.igb.rx_process_limit="-1"
hw.igb.tx_process_limit="-1"
- TinyCore USB installer v1.8 download http://pcengines.ch/file/apu-bootable-usb-installer_v1.8.exe (erstellt bootbaren USB Stick)
- BIOS von https://pcengines.github.io/#mr-21 downloaden (wir haben apu2 v4.9.0.4 oder neuer)
- BIOS file (apu2_v4.9.0.4.rom) auf den USB Stick kopieren
- Serial Kabel an APU anhängen, 115200 8N1 (Nullmodem, ausgekreuzt)
- APU mit eingestecktem USB Stick booten (default starten die APUs ab USB Stick wenn vorhanden)
- BIOS flashen:
flashrom -w apu2_v4.9.0.4.rom
Linux (2)
List Pool
zpool listShow detailed health status
zpool status rpoolShow all properties for the pool
zpool get all rpoolShow I/O Stats
zpool iostat -v rpoolList datasets
root@pve:~# zfs list
NAME USED AVAIL REFER MOUNTPOINT
rpool 20.7G 1.73T 139K /rpool
rpool/ROOT 6.12G 1.73T 128K /rpool/ROOT
rpool/ROOT/pve-1 6.12G 1.73T 6.12G /
rpool/data 14.6G 1.73T 128K /rpool/data
rpool/data/vm-100-disk-0 10.7G 1.73T 10.7G -
rpool/data/vm-101-disk-0 3.85G 1.73T 3.85G -
Replacing a failed disk
root@pve:~# zpool status -v
  pool: rpool
 state: ONLINE
  scan: resilvered 143G in 15h22m with 0 errors on Fri Oct 14 10:59:46 2016
config:

        NAME        STATE     READ WRITE CKSUM
        rpool       ONLINE       0     0     0
          raidz1-0  ONLINE       0     0     0
            sda2    ONLINE       0     0     0
            sdb2    ONLINE       0     0     0
            sdc2    ONLINE       0     0     0

errors: No known data errors
Assuming the failing disk is /dev/sdb2, first take the disk offline:
root@pve:~# zpool offline rpool /dev/sdb2
root@pve:~# zpool status -v
  pool: rpool
 state: DEGRADED
status: One or more devices has been taken offline by the administrator.
        Sufficient replicas exist for the pool to continue functioning in a
        degraded state.
action: Online the device using 'zpool online' or replace the device with
        'zpool replace'.
  scan: resilvered 143G in 15h22m with 0 errors on Fri Oct 14 10:59:46 2016
config:

        NAME        STATE     READ WRITE CKSUM
        rpool       DEGRADED     0     0     0
          raidz1-0  DEGRADED     0     0     0
            sda2    ONLINE       0     0     0
            sdb2    OFFLINE      0     0     0
            sdc2    ONLINE       0     0     0

errors: No known data errors
replace the physical disk & clone a working disk’s partition tables, copy the GRUB boot partition, copy the MBR, and rerandomize the GUIDs before letting ZFS at the disk again.
root@pve:~# sgdisk --replicate=/dev/sdb /dev/sda
root@pve:~# sgdisk --randomize-guids /dev/sdb
root@pve:~# grub-install /dev/sdb
Replace the disk in the ZFS pool
root@pve:~# zpool replace rpool /dev/sdb2
Check Status:
root@pve:~# zpool status -v
  pool: rpool
 state: DEGRADED
status: One or more devices is currently being resilvered.  The pool will
	continue to function, possibly in a degraded state.
action: Wait for the resilver to complete.
  scan: resilver in progress since Mon Oct 17 13:02:00 2016
    147M scanned out of 298G at 4.46M/s, 19h1m to go
    47.3M resilvered, 0.05% done
config:

	NAME             STATE     READ WRITE CKSUM
	rpool            DEGRADED     0     0     0
	  raidz1-0       DEGRADED     0     0     0
	    sda2         ONLINE       0     0     0
	    replacing-1  OFFLINE      0     0     0
	      old        OFFLINE      0     0     0
	      sdb2       ONLINE       0     0     0  (resilvering)
	    sdc2         ONLINE       0     0     0

errors: No known data errors
Add Cache to existing pool
zpool add -f rpool cache sdcAnzeigen aller Drives:
./storcli64 /c0 show
Output (als Beispiel):
——————————————————————————
EID:Slt DID State DG Size Intf Med SED PI SeSz Model Sp
——————————————————————————
252:0 8 Onln 0 931.0 GB SATA SSD N N 512B Samsung SSD 850 EVO 1TB U
252:1 9 Onln 0 931.0 GB SATA SSD N N 512B Samsung SSD 850 EVO 1TB U
Drive “offline” setzen:
./storcli64 /c0 /e252 /s1 set offline
Drive als “missing” setzen:
./storcli64 /c0 /e252 /s1 set missing
Drive spindown zum entfernen:
./storcli64 /c0 /e252 /s1 spindown
Danach Disk/SSD ersetzen. Der Rebuidl startet automatisch. Den Status kann man mittels folgendem Befehl kontrollieren:
./storcli64 /c0 /eall /sall show rebuild
Beispiel output:
———————————————————-
Drive-ID Progress% Status Estimated Time Left
———————————————————-
/c0/e252/s0 – Not in progress –
/c0/e252/s1 46 In progress –
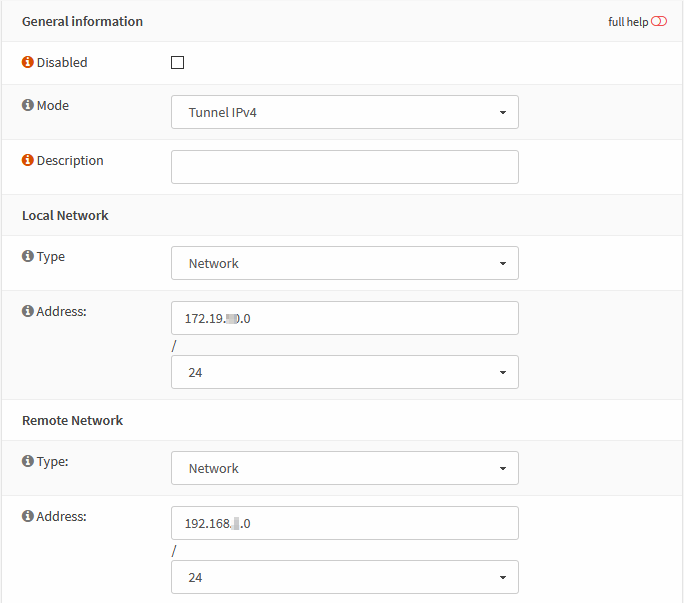
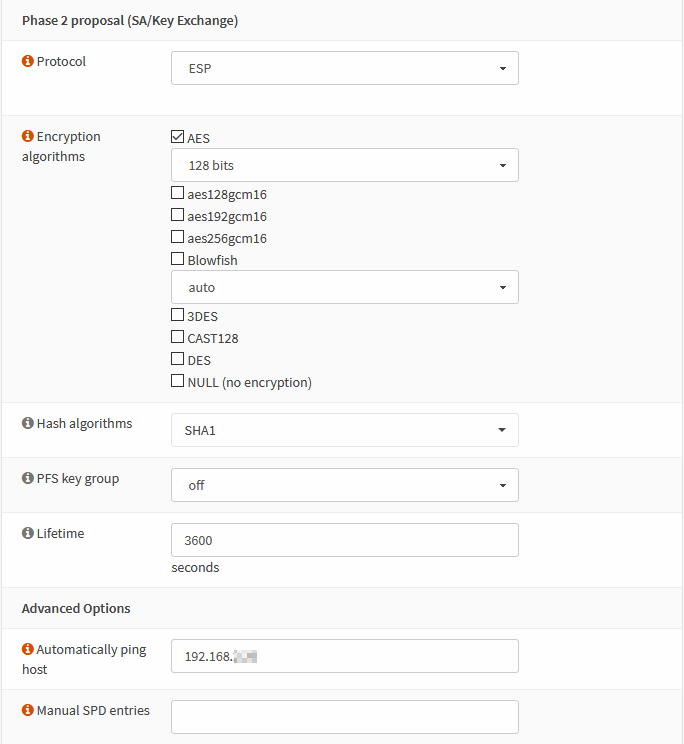
OPNsense (5)
Wichtig: Auf den Seiten „Local“, „Endpoints“, „General“ nach Änderungen jeweils „Save“ klicken
Server (MeinWGServer)
Local
Name: MeinWGServer
Public Key: <leer lassen>, wird nach dem Speichern automatisch generiert
Private Key: <leer lassen>, wird nach dem Speichern automatisch generiert
Listen Port: 51820 (oder was auch immer)
DNS Server: 80.80.80.80 oder so
Tunnel Address: Das VPN Netz, Bsp: 2a00:d08:a000:x::1/64
Peers: Müssen wir erst erstellen und dann auswählen
Endpoints
Name: MeinWGZuhause
Public Key: <leer lassen>, da kommt danach der Public Key von "Remote Site" rein
Shared Secret: <nichts>
Allowed IPs: 2a00:d08:a000:x::2/64
Rest leer lassen
"Save"
-> Zurück zu "Local" -> MeinWGServer editieren -> bei "Peers": "MeinWGZuhause" anwählen -> Save
Remote Site (MeinWGZuhause)
Local
Name: MeinWGZuhause
Public Key: <leer lassen>, wird nach dem Speichern automatisch generiert
Private Key: <leer lassen>, wird nach dem Speichern automatisch generiert
Listen Port: 51821
Tunnel Address: 2a00:d08:a000:x::2/64
Peers: Müssen wir erst erstellen und dann auswählen
Endpoints
Name: MeinWGServer
Public Key: Vom Server -> Local -> MeinWGServer -> Edit -> "Public Key" kopieren und einfügen
Allowed IPs: ::/0
Endpoint Address: <IP vom Server>
Endpoint Port 51820
Rest leer lassen
"Save"
-> Zurück zu "Local" -> MeinWGZuhause editieren -> bei "Peers": "MeinWGZuhause" anwählen -> Save
Jetzt braucht der Server noch den Public Key von der Remote Site (MeinWGZuhause)
Von Remote Site (MeinWGZuhause) -> Local -> MeinWGZuhause -> Edit -> "Public Key" kopieren
Auf Server (MeinWGServer) -> Endpoints -> MeinWGZuhause -> Edit -> "Public Key"  einfügen
Noch etwas Kleinarbeit:
- Auf der „Server Firewall“ auf dem WAN Interface Port 51820/UDP zulassen
- Auf beiden Firewalls unter „Firewall“ auf dem Wireguard Interface IPv4/IPv6 auf Durchzug stellen
- Auf der „Remote Site“ Interfaces -> Assignments -> wg0 hinzufügen
- Erstelltes OPTx Interface wählen -> Description: WG
- IPv6 Configuration Type -> Static IPv6
- IPv6 address -> 2a00:d08:a000:x::2/64
- Auf der „Remote Site“
- LAN: IPv6 Configuration Type -> Static IPv6
- IPv6 address -> 2a00:d08:a000:x::3/64
- Services -> Router Advertisements
- Router Advertisements -> Router Only
- RA Interface -> LAN (static)
- Advertise Default Gateway [x]
- Advertise Routes 2a00:d08:a000:x::/64
Im .ovpn File können folgende Anpassungen gemacht werden (Zeilen hinzufügen):
Verwenden des wintun Adapters (schnellere Verbindung, schnellerer Verbindungsaufbau) nur mit OpenVPN Client >2.5:
windows-driver wintun
Spezifischen TAP / wintun Adapter verwenden:
dev-node ADAPTERNAME
Ubiquiti (2)
Firmware download:
Gen1: https://www.ui.com/download/unifi/unifi-cloud-key
Gen2: https://www.ui.com/download/unifi/unifi-cloud-key-gen2
BIOS / Firmware Update:
root@UniFi-CloudKey:/tmp# ubnt-systool fwupdate https://dl.ui.com/unifi/cloudkey/firmware/UCK/UCK.mtk7623.v1.1.13.818cc5f.200430.0950.bin
Software Update:
cd /tmp

wget https://dl.ui.com/unifi/6.0.43/unifi_sysvinit_all.deb

dpkg -i unifi_sysvinit_all.deb

rm unifi_sysvinit_all.deb
Zertifikat zusammenbasteln:
openssl pkcs12 -export -out certificate.pfx -inkey login.wifi.legatech.ch.key -in login.wifi.legatech.ch.crt -certfile intermediate.crt
Key Passwort entfernen:
openssl rsa -in login.wifi.legatech.ch.key -out login.wifi.legatech.ch.noPW.key
Files mit WinSCP auf den Controller kopieren:
login.wifi.legatech.ch.noPW.key

login.wifi.legatech.ch.crt

certificate.pfx
Per SSH auf den Controller verbinden und dann:
service unifi stop
Bestehenden keystore löschen:
rm /usr/lib/unifi/data/keystore
Bestehendes Zertifikat / Key entfernen:
rm /data/unifi-core/config/unifi-core.crt

rm /data/unifi-core/config/unifi-core.key
Neuen keystore installieren:
keytool -importkeystore -deststorepass aircontrolenterprise -destkeypass aircontrolenterprise -destkeystore /usr/lib/unifi/data/keystore -srckeystore /root/certificate.pfx -srcstoretype PKCS12 -srcstorepass temppass -alias ubnt -noprompt
Zertifikate / Key ersetzen:
cp /root/login.wifi.legatech.ch.noPW.key /data/unifi-core/config/unifi-core.key

cp /root/login.wifi.legatech.ch.crt /data/unifi-core/config/unifi-core.crt
Cloudkey neu starten:
reboot
Windows (5)

Problem
Windows 10 uEFI based systems get error 0xc000000e on boot after cloning.
Error Message
Your PC/Device needs to be repaired
A required device isn’t connected or can’t be accessed
Error code: 0xc000000e
You’ll need to use recovery tools. If you don’t have any installation media (like a disc or USB device), contract your PC administrator or PC/Device manufacturer.
- Run:
DISKPART - Run following commands from the DISKPART prompt to assign drive letters to the EFI System Partition and the partition containing the restored Windows operating system volume:
LIST DISK
SEL DISK 0(this is an example. Replace 0 with disk number for the drive containing OS as found in the LIST DISK output)
LIST VOL
SEL VOL 3(this is an example. Replace 3 with the volume number in the list corresponding with EFI System Partition. On a default install of Windows 10 this will be listed as the 99 MB FAT32 Hidden partition, but size may vary)
ASSIGN LETTER=E:(this is an example. Any available drive letter may be used in place of e:. If the EFI System Partition already shows a drive letter, note the letter shown and skip this step)
SEL VOL 1(this is an example. Replace 1 with the volume number corresponding with the restored C: drive. Look at size of listed volumes to determine which is the restored C:)
ASSIGN LETTER=F:(this is an example. Any available drive letter may be used in place of f:. If the Windows OS partititon already shows a drive letter, note the letter shown and skip this step)
EXIT - Run the following commands from the command prompt:
BCDEDITNote the „identifier“ listed for Windows Boot Manager and Windows Boot loader after running the above command. The following examples use {bootmgr} and {default} as the identifiers, respectively. Examples below also use e: and f: as the drive letters as set in diskpart above. Replace these in the commands with the drive letters assigned in diskpart if differentBCDEDIT /SET {bootmgr} device partition=e:
BCDEDIT /SET {default} device partition=f:
BCDEDIT /SET {default} osdevice partition=f: - Remove the SRD disk and reboot the computer.
Win7/Win10: bootet nicht mehr, „ein angeschlossenes Gerät kann nicht gefunden werden“:
* Booten mit CD/USB
* Eingabeaufforderung (Reparatur)
* attrib c:\boot\BCD -s -h -r
* ren c:\boot\BCD c:\boot\BCD.org
* bootrec /rebuildbcd
* bootrec /fixboot
* bootrec /fixmbr
System rebooten und glücklich sein.
Drucker auflisten:
PS C:\> Get-Printer |fl

Name                         : \\server\OKI-MC873

ComputerName                 : server

Type                         : Connection

ShareName                    : OKI-MC873

PortName                     : WSD-2c689077-228f-41d7-b1f3-d1ca727e3613.0032

DriverName                   : OKI MC873(PCL6)

...
Drucker entfernen:
PS C:\> Remove-Printer -Name "\\server\OKI-MC873"
FOR /L %i in (1,1,254) do @ping -n 1 -w 200 192.168.1.%i | find "TTL"
Windows Server (13)
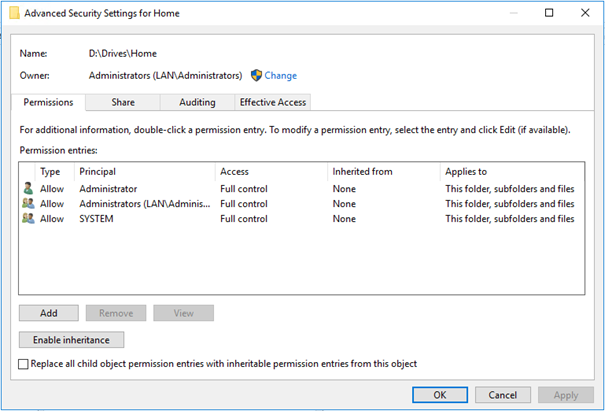
Ordnerfreigaben / Shares Windows Domain
Berechtigungen Home Ordner
Freigabe

NTFS
GPO Netzlaufwerk verbinden
Allgemeine Laufwerke
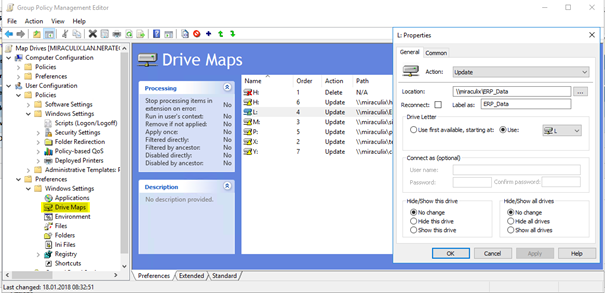
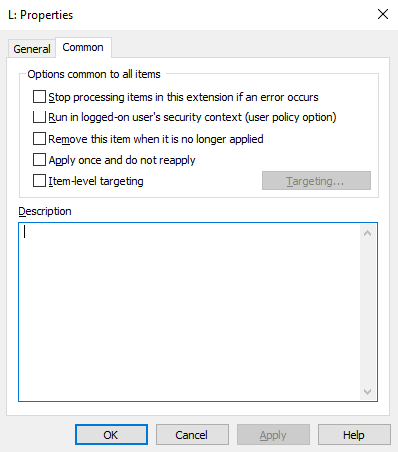
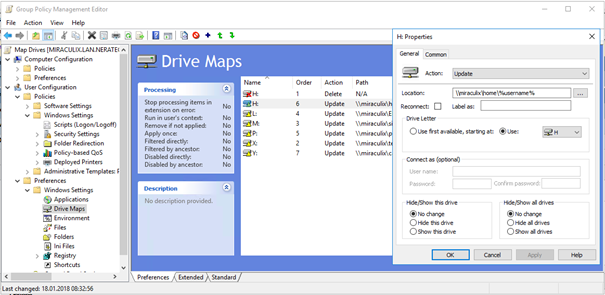
Home Laufwerk
- Powershell als Administrator öffnen
- Zeitdienst stoppen:
net stop w32time - NTP Server einstellen:
w32tm /config /syncfromflags:manual /manualpeerlist:"0.ch.pool.ntp.org 1.ch.pool.ntp.org 2.ch.pool.ntp.org 3.ch.pool.ntp.org" - Als zuverlässige source definieren (nur für DC relevant):
w32tm /config /reliable:yes - Zeitdienst starten:
net start w32time - Config anzeigen:
w32tm /query /configuration - Status anzeigen:
w32tm /query /status
- regedit
- HKEY_LOCAL_MACHINE\SYSTEM\CurrentControlSet\Services\LanmanServer\Shares -> Shares Rechtsklick -> Exportieren
- Datei als „Shares.reg“ speichern
- Auf dem neuen Server die „Shares.reg“ importieren
- Sobald die Pfade kopiert sind erscheinen die Freigaben
- Wenn sich auf dem Server die Pfade der Daten ändert können diese unter HKEY_LOCAL_MACHINE\SYSTEM\CurrentControlSet\Services\LanmanServer\Shares angepasst werden
“C:\Windows\system32\rundll32.exe Windows cannot access the specified device, path, or file. You may not have the appropriate permissions to access the item.”
- gpedit.msc ausführen
- Computerkonfiguration -> Windows-Einstellungen -> Sicherheitseinstellungen -> Lokale Richtlinien -> Sicherheitsoptionen -> Benutzerkontensteuerung: Administratorgenehmigungsmodus für das integrierte Administratorkonto: Aktiviert
- Abmelden und wieder anmelden
1. Status „Starten“
dfsrmig /setGlobalState 0
Damit werden alle Domänencontroller auf den Status „Starten“ gesetzt. Zum verifizieren starten wir jetzt noch folgenden Befehl:
dfsrmig /GetMigrationState
Dort sollte jetzt „Alle Domänencontroller wurden erfolgreich zum globalen Status („Starten“) migriert“ stehen.

Dann können wir weitermachen..
2. Status „Vorbereitet“
dfsrmig /setGlobalState 1
Damit werden alle Domänencontroller auf den Status „Vorbereitet“ gesetzt.
Nach einer gewissen Zeit sollte der Status auf allen Domänencontroller gesetzt worden sein. Zum überprüfen kann wieder der Befehl
dfsrmig /GetMigrationState
abgesetzt werden.

Wenn die Meldung „Alle Domänencontroller wurden erfolgreich zum globalen Status („Vorbereitet“) migriert“ kommt, können wir wieder weiter machen..
3. Status „Umgeleitet“
dfsrmig /setGlobalState 2
Damit werden alle Domänencontroller auf den Status „Umgeleitet“ gesetzt.
Nach einer gewissen Zeit sollte der Status auf allen Domänencontroller gesetzt worden sein. Zum überprüfen kann wieder der Befehl
dfsrmig /GetMigrationState
abgesetzt werden.

Wenn die Meldung „Alle Domänencontroller wurden erfolgreich zum globalen Status („Umgeleitet“) migriert“ kommt, können wir wieder weiter machen..
4. Status „Entfernt“
dfsrmig /setGlobalState 3
Damit werden alle Domänencontroller auf den Status „Entfernt“ gesetzt.
Nach einer gewissen Zeit sollte der Status auf allen Domänencontroller gesetzt worden sein. Zum überprüfen kann wieder der Befehl
dfsrmig /GetMigrationState
abgesetzt werden.

Wenn die Meldung „Alle Domänencontroller wurden erfolgreich zum globalen Status („Entfernt“) migriert“ kommt, sind wir mit der Migration fertig.
5. Migration überprüfen
Durch die Migration wurde der SYSVOL-Ordner unter C:\Windows zu einem SYSVOL_DFSR. ALter Ballast wie der Staging-Ordner wurde entfernt bzw. nicht mitmigriert. Die SYSVOL und NETLOGON-Freigabe zeigen nun auf die Inhalte des neuen SYSVOL_DFSR. Der Dateireplikationsdienst wurde auf allen Domänencontrollern auf deaktiviert gesetzt.
Drucker auflisten:
PS C:\> Get-Printer |fl

Name                         : \\server\OKI-MC873

ComputerName                 : server

Type                         : Connection

ShareName                    : OKI-MC873

PortName                     : WSD-2c689077-228f-41d7-b1f3-d1ca727e3613.0032

DriverName                   : OKI MC873(PCL6)

...
Drucker entfernen:
PS C:\> Remove-Printer -Name "\\server\OKI-MC873"
FOR /L %i in (1,1,254) do @ping -n 1 -w 200 192.168.1.%i | find "TTL"
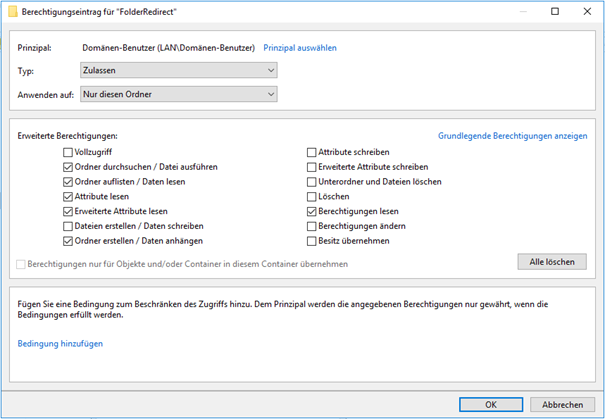
Share
z.B. C:\Daten\FolderRedirect
Freigabe:
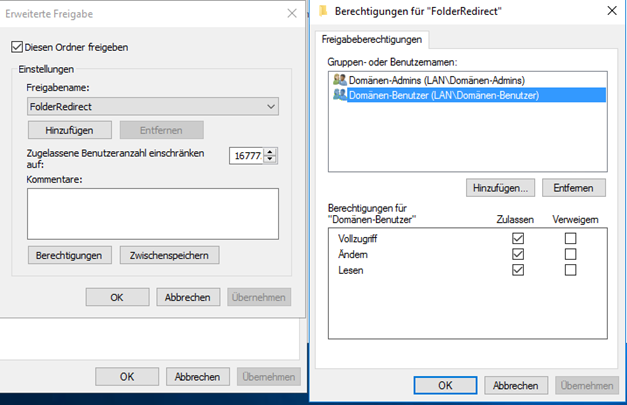
NTFS:
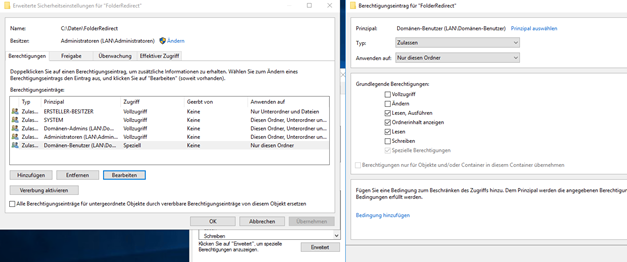
Rechte für Domänen-Benutzer:
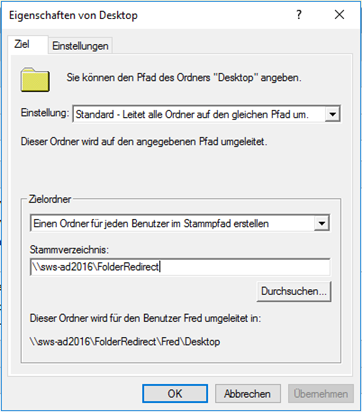
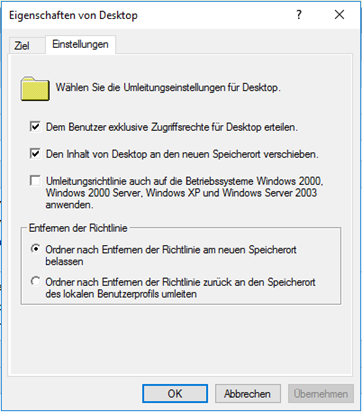
GPO:
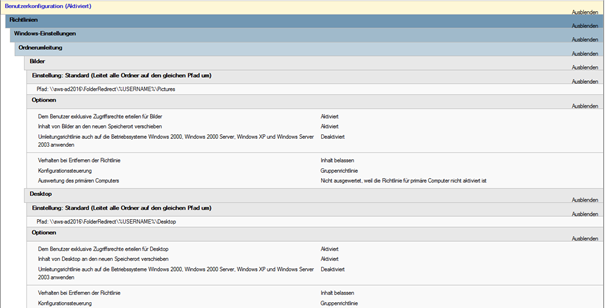
Benutzerkonfiguration -> Richtlinien -> Windows-Einstellungen -> Ordnerumleitung
Powershell
- In den Installmode wechseln
change user /install - XML File (configuration-Office2019Std.xml) erstellen / anpassen
<Configuration>
<Add OfficeClientEdition=“64″ Channel=“PerpetualVL2019″>
<Product ID=“Standard2019Volume“ PIDKEY=“FQD9B-NG73B-KPVDV-xxxxx-xxxxx“>
<Language ID=“de-de“ />
</Product>
<Product ID=“ProjectStd2019Volume“ PIDKEY=“3NWM6-4JBRY-XBM67-xxxxx-xxxxx“>
<Language ID=“de-de“ />
</Product>
</Add>
<Display Level=“None“ AcceptEULA=“TRUE“ />
<Property Name=“AUTOACTIVATE“ Value=“1″ />
</Configuration> - Falls gewünscht erst downloaden
.\setup.exe /download .\configuration-Office2019Std.xml - Installation starten
.\setup.exe /configure .\configuration-Office2019Std.xml - Installmode verlassen
change user /execute
Powershell öffnen
Folgender Befehl verschiebt alle Rollen auf den DC „dc2“. Der Befehl kann auf einem beliebigen DC ausgeführt werden.
Move-ADDirectoryServerOperationMasterRole “dc2” –OperationMasterRole 0,1,2,3,4Wenn man nur einzelne Rollen verschieben will sind dies die Zahlen:
| PDCEmulator | 0 |
| RIDMaster | 1 |
| InfrastructureMaster | 2 |
| SchemaMaster | 3 |
| DomainNamingMaster | 4 |
Falls der DC welcher die FSMO aktuell hat tot ist, kann man mit -force die Verschiebung erzwingen, dann darf aber der alte/defekte DC nie mehr aktiv werden.
Anzeigen wer die FSMO Rollen hat: NetDOM /query FSMO
Powershell:
Verzeichnis erstellen:
c:\dhcpExport bestehenden DHCP Server:
Export-DhcpServer -ComputerName "alterDHCPServer" -Leases -File "C:\DHCP\OldDHCPConf.xml" –VerboseImport neuer DHCP Server:
Import-DhcpServer -Leases –File "C:\DHCP\OldDHCPConf.xml" -BackupPath "C:\DHCP\Backup\" –Verbose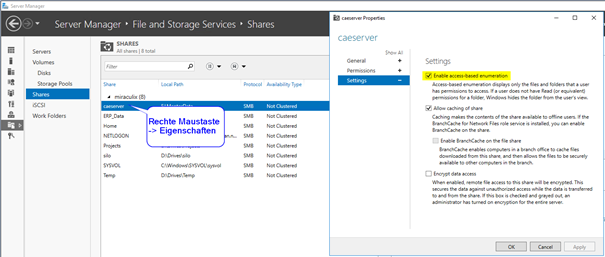
In diesem Beispiel wird für 172.29.80.2 – 172.29.80.50 ein A Eintrag im Format dynvpn-xxx.vpn.domain.com erstellt, sowie der passende PTR Eintrag.
Einträge vorbereiten
CSV Datei erstellen mit den Einträgen, beispielsweise in Excel. Format:
HostName,IPAddr
dynvpn-002,172.29.80.2
dynvpn-003,172.29.80.3
dynvpn-004,172.29.80.4
Speichern als vpn.txt
Zonen im DNS erstellen
Die Zonen und Reverse DNS Zonen müssen im DNS bereits vorhanden sein.
Einträge erstellen
PowerShell als Administrator öffnen und ins Verzeichnis mit der vpn.txt Datei wechseln.
PS C:\> cd D:\BulkDNS\
Einträge erstellen:
PS D:\BulkDNS> Import-CSV vpn.txt | %{Add-DnsServerResourceRecordA -Name $_.“HostName“ -ZoneName „vpn.domain.com“ -IPv4Address $_.“IPAddr“ -CreatePtr}
Nach einem Reload & Refresh sind die Einträge im DNS Admin Tool sichtbar.